With all the hoopla about chatbots and the introduction of artificial intelligence as a means of providing services to our customers, I wanted to understand what AI is all about and what it takes to develop an effective chatbot adoption strategy. After a few weeks of research, I decided to implement a chatbot on my website dedicated to knowledge management culture.
The Role of Knowledge
All of my research pointed to one thing that I needed to make sure that the chatbot implementation would be successful: knowledge. When I thought about what knowledge I have access to, the most extensive database is knowledge about knowledge. One of the exercises in the KCS Principles course offered through HDI is the development of frequently asked questions from executives, managers, and knowledge workers about the adoption of Knowledge-Centered Service (KCS). The questions and answers are developed as a mechanism to help address possible objections to the adoption of KCS. After capturing these FAQs for the past 14 years, I decided to use them to train my chatbot.
Meet Sherlock
After weeks of trying to figure out the best name for my new chatbot, I decided to call my bot Sherlock. And Sherlock's primary purpose is to provide knowledge about knowledge management and the practices embedded in KCS. As you will see later in this post, the name you choose for your chatbot can have some unanticipated side effects.
Choose Your Publishing Platform
The first step in a chatbot strategy is to determine what publishing platform you want to use. There are many options available that include integrating the chatbot with Facebook, Salesforce, WhatsApp, Slack, Kik, Telegram, and many others. The publishing platform is where your users will go to access the chatbot. In my case, I wanted to develop and implement a chatbot for free. The available publishing platform that I have at my disposal is WordPress, one of the largest open-source website and blog content management systems.
I initially debated between using my WordPress site and integrating the chatbot into Facebook Messenger and connecting it to my speaker page. The benefits of integrating into Facebook are a 24x7 online presence to answer questions. When I compared the traffic and followers on Facebook to the traffic on my website (using Google Analytics), I decided that there was more traffic to my site. Why is this important? I wanted to serve my customers where they were most likely to connect. But also, I had to consider the chatbot training requirements. The only way to improve the chatbot is to have people use it. By installing the chatbot on WordPress and, in particular, on a website dedicated to knowledge management culture, I could target people specifically who were interested in the adoption of KCS.
Choose Your Chatbot Platform
Once the publishing platform is identified, the next step is to determine the chatbot development platform to use with your chosen publishing platform. Again, with a simple Google search, I was able to identify the top five WordPress plugins that would provide me with chatbot integration. I decided to go with MyChatbot, which integrates DialogFlow AI engine into my Wordpress site. MyChatbot provides a chat window at the bottom of each page of the website. My goal in choosing a tool was that it was free and easy to use and had a high level of customer satisfaction.
Installation and Configuration of Plugin
One of the most surprising outcomes of the chatbot adoption was the ease of implementation. Literally, within five minutes, I had a chatbot up and running on my site. Of course, the bot had no knowledge to use to answer questions, but it was incredibly easy to do. Installation required three primary things: match the color scheme to my website, name the chatbot, and identify how it is powered.
General Settings
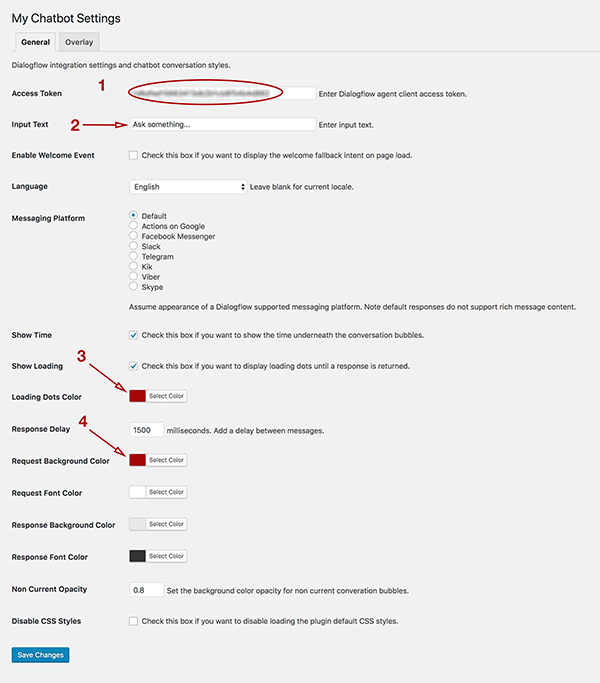
The figure below shows the first of two configuration pages that I had to complete as part of the implementation. After signing up for a Dialogflow account, I was provided with an access token that I entered into My Chatbot settings (1). I set the input text (what is shown in the bot to entice the customer to type in something) to “Ask something…” (2) and changed the color for loading dots (3) and request background color (4) to a color to match my site. I left all of the other settings on default.

Overlay Settings
On the overlay tab shown in the next figure, I set the header background color (1). The next two settings require a bit of thought. I chose Sherlock as my chatbot’s name (2) thinking that it was a fun name and would capture people's attention. As people began using the chatbot, they started to ask questions about Sherlock and Watson that had nothing to do with knowledge management but instead were more focused on the mythical character from books and movies. I thought about changing the name later but felt that it might be more fun to develop a personality into the chatbot with a play on Watson (the IBM AI platform) and Sherlock (the bot about knowledge).
The last decision was the Powered By Text field (3). Essentially this is a small bit of text displayed in the bot that tells the customer the origin of the knowledge. Here I chose to be a complete geek and use "The Collective." Notice that there is HTML code that permits the customer to click on "The Collective." I chose to have this do nothing but saved the settings for later in case I wanted customers to have access to the knowledge base in the future.
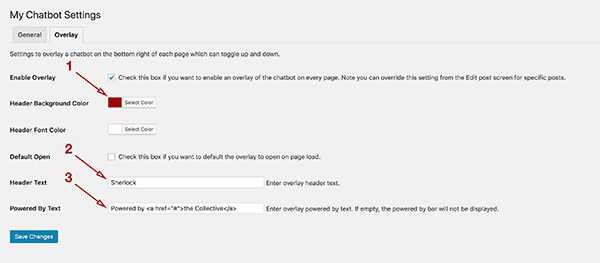
Also, notice from the overlay settings, I can choose to have the chatbot on every page, or I can turn this feature off. 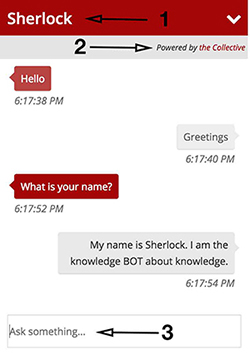 If it is not selected, I can manually have the chatbot show by enabling the chatbot on each page separately using the page or post settings. The results of the MyChatbot integration can be seen in the next figure. Notice the name (1), powered by (2), and prompting question (3) choices in the live chatbot.
Exploring the Chatbot Engine
With Sherlock now working and live on my production site, I began to play around with Sherlock by asking simple questions. The only response it had in the settings was a generic greeting response and a response to a question about a name. Neither response was appropriate and had to be changed.
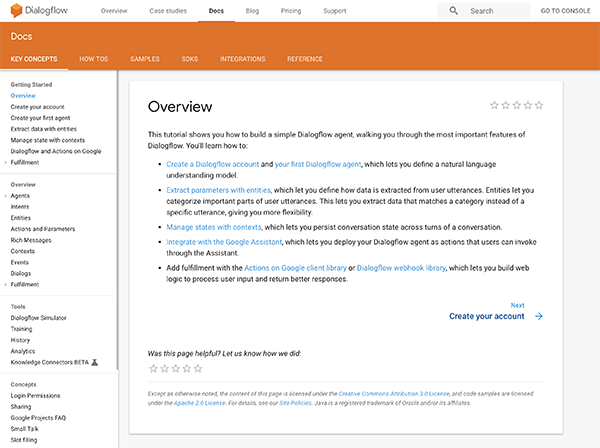
The next step in the implementation is to figure out how to add knowledge in the form of questions and answers to the chatbot platform. After logging in to the Dialogflow site, the first thing I did was click on the “Getting Started” link on the home page and began working through the online tutorial. The figure below shows the extensive help documents that gave me the basics I needed to get started.
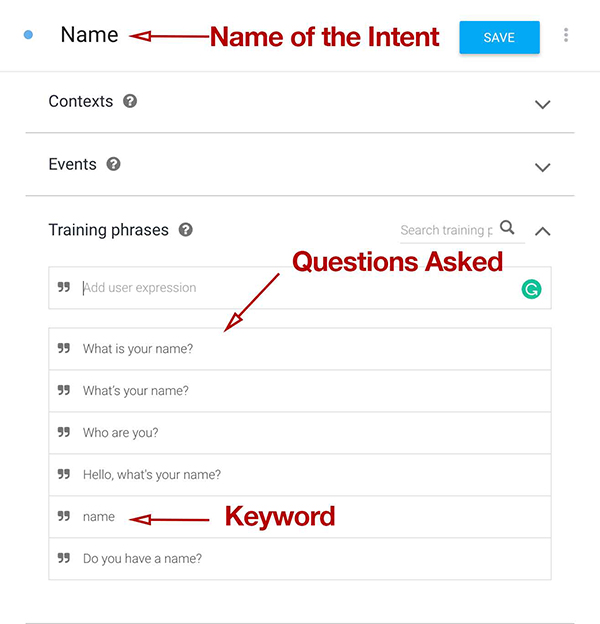
Updating the Name Response
The first thing I wanted to do was to update the default response to the question, “What is your name?” You add each question and answer into the system by creating an INTENT. The INTENT that I needed to edit was called NAME. The figure below shows the NAME INTENT and the various ways that someone can ask about the name of the chatbot listed in the training phrases section. Notice that you can continue to enter in as many ways as you want for asking about someone's name. Also, notice that the word "name" is also added individually. Keyword use is important as the system will connect any question entered that has the word "name" in it to the responses listed in this intent.
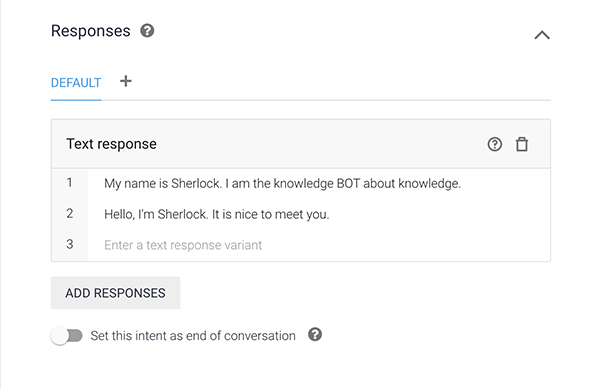
The next step is to add the preferred responses into the INTENT. I chose to add only two responses as shown in the next figure. I also did not add additional responses that would provide more of a dialog around the name question. For example, I could have asked “What is your name?” as a follow-up question to start an extended dialog.
Using the knowledge collected over time, I began adding as many INTENTS as possible, trying not to repeat any questions but instead to add similar questions to one INTENT. The figure below shows the list of INTENTS as more knowledge was entered into the chatbot. It is important to think about a strategy for naming the INTENTS as very quickly it becomes difficult to find the right INTENT to add content to when you have a similar Q&A to add.
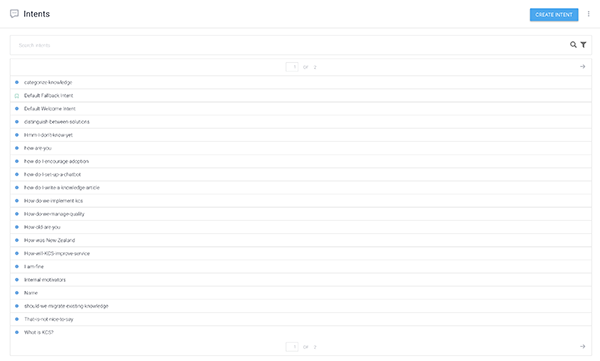
Click image to view larger version.
Training the Chatbot
After I had Sherlock up and running, I needed to have someone use the chatbot and ask questions. I solicited help from the HDI Higher Education Leadership Forum meeting in Bozeman, MT in August. Each of the attendees was asked to create knowledge articles to enter into the bot and also to test the bot by asking simple questions. Each user’s questions are collected into a single request, and the request is entered into a section called TRAINING.
To train Sherlock, I had to open each user’s request and then match each of the individual questions with existing INTENTS or create new INTENTS. The system attempts to match each of the questions with existing INTENTS and sometimes makes mistakes that need to be fixed. In other cases, completely new questions require time to develop a new INTENT. If a question is correctly matched to an existing INTENT and the question is new, it is simply added as a new training phrase to the existing INTENT. While this may sound confusing, training the bot is relatively easy to do but it is time consuming the more the bot is used. The next figure shows the list of training requests that have been added (1) and those that still need to be added (2). Every time I log in to the system, I need to check for new requests in the list.
The most important thing I observed about the initial stages of training Sherlock is that the name Sherlock was too enticing and people wanted to ask questions entirely outside the scope of the project. For example, notice the question "Who is the Hound of Baskerville?" in the list of training requests.
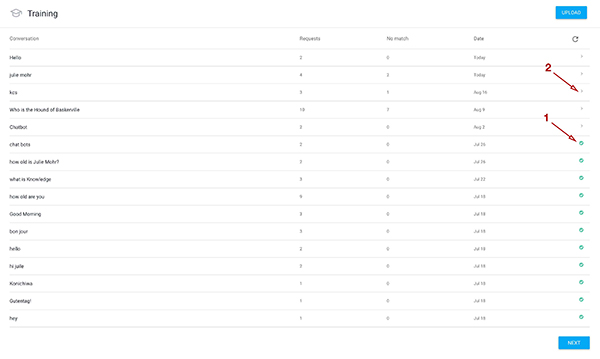
Click image to view larger version.
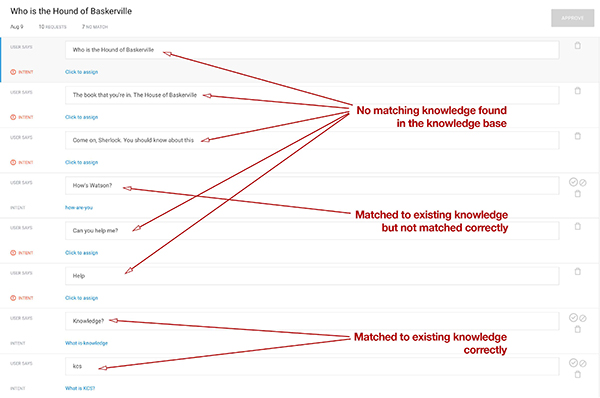
The figure below shows the list of requests entered by one user and the matching or missing INTENTS. As you can see, five of the questions have no matching INTENTS, one question is matched to the wrong INTENT, and two are matched to existing INTENTS correctly. The matching occurred automatically by the system based on the words that were used. The chatbot must be trained by matching the five with no INTENTS either by adding the questions to existing INTENTS or creating a new INTENT. The one question that was matched incorrectly required the creation of a new INTENT.
The matching of the question, “How is Watson?” was erroneously paired with the INTENT titled How-Are-You. While this was close, Sherlock would have answered “I've been in the office all day. Can't wait for the weekend.” Over time, as more INTENTS are added, these types of mistakes will be fewer and far between.
Click image to view larger version.
Training the bot is a combination of having customers use the system and monitoring the questions and matching responses. Sherlock now has more than 50 INTENTS with some that contain multiple questions and responses.
Training the bot is a combination of having customers use the system and monitoring the questions and matching responses.

Analytics
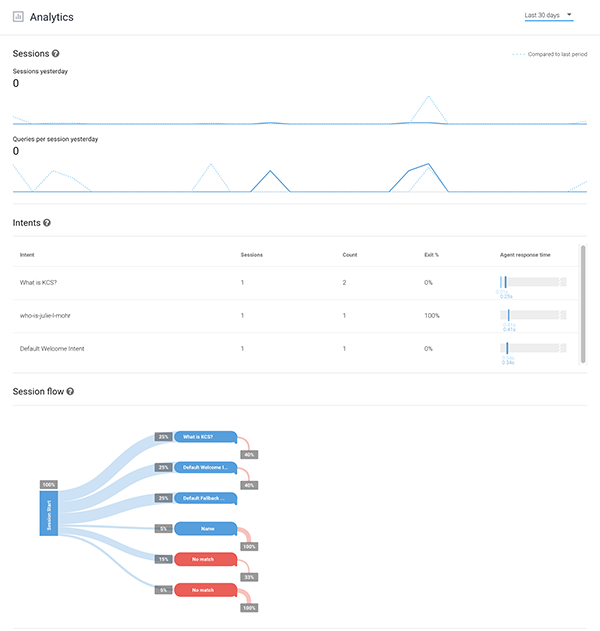
Another part of implementing a chatbot is monitoring the success of Sherlock. Dialogflow provides visibility not only into the number of sessions but also a visualization of how knowledge is being used. The next figure shows the available analytics and the visualization of the knowledge model.
Click image to view larger version.
General Observations of Chatbot Implementation
The implementation process of the chatbot is relatively easy, and the tools seem to have a well-documented process. The two most important success factors are having knowledge written in the customer's context (the way the customer would pose the question) and consistent training of the bot to improve responses. Some of the options require careful consideration as part of the ongoing strategy, including what to name the bot and the publishing platform. While adoption is easy, it is essential to establish a strategy that will allow the organization to experiment with this emerging channel, learn from the experience, and develop a more comprehensive approach over time.
Artificial Intelligence is an exciting, emerging field that can help us not only serve customers in new ways, but also provide incredible insight into the customer experience. In my next article, I will outline a chatbot adoption strategy based on what I have learned during the implementation and management of Sherlock. Please feel free to give Sherlock a try. Your questions will be added to the Collective.
Julie is a dynamic, engaging change agent who brings authenticity, integrity, and passion to practitioners worldwide. Through her books, articles, speaking, consulting, and teaching, her purpose is to spark change in the world with thought-provoking dialog and interaction on topics of authentic leadership, business strategy, knowledge management, organizational culture, and innovation. Julie has a B.S. in computer science from The Ohio State University and an MaED from the University of Phoenix and is currently pursuing her Ph.D. in Management and Organizational Leadership in Information Systems & Technology from the University of Phoenix. She is an ITIL Expert, Certified Help Desk Director, and Certified Governance IT Professional. She is an HDI Business Associate and teaches training and certification classes for service and support professionals. Visit her website, and follow her on Twitter @JulieMohr, YouTube, and LinkedIn.